Unstable Wi-Fi connections can be frustrating and cause disruptions in your daily life. There are a few things you can do to fix an unstable connection, including checking for wireless overlap, updating your router’s firmware, and more.
1. Check for Wireless Overlap
One of the most common causes of an unstable Wi-Fi connection is interference from other wireless devices. If you have multiple devices competing for the same frequency band, it can lead to signal degradation and dropouts. To fix this, try changing the channel that your router is using. Most routers have a built-in tool that lets you scan for the best channel to use.
How To Check For Wireless Overlap
One of the most common causes of an unstable Wi-Fi connection is interference from other wireless devices. If you have multiple devices competing for the same frequency band, it can lead to signal degradation and dropouts. To fix this, try changing the channel that your router is using. Most routers have a built-in tool that lets you scan for the best channel to use.
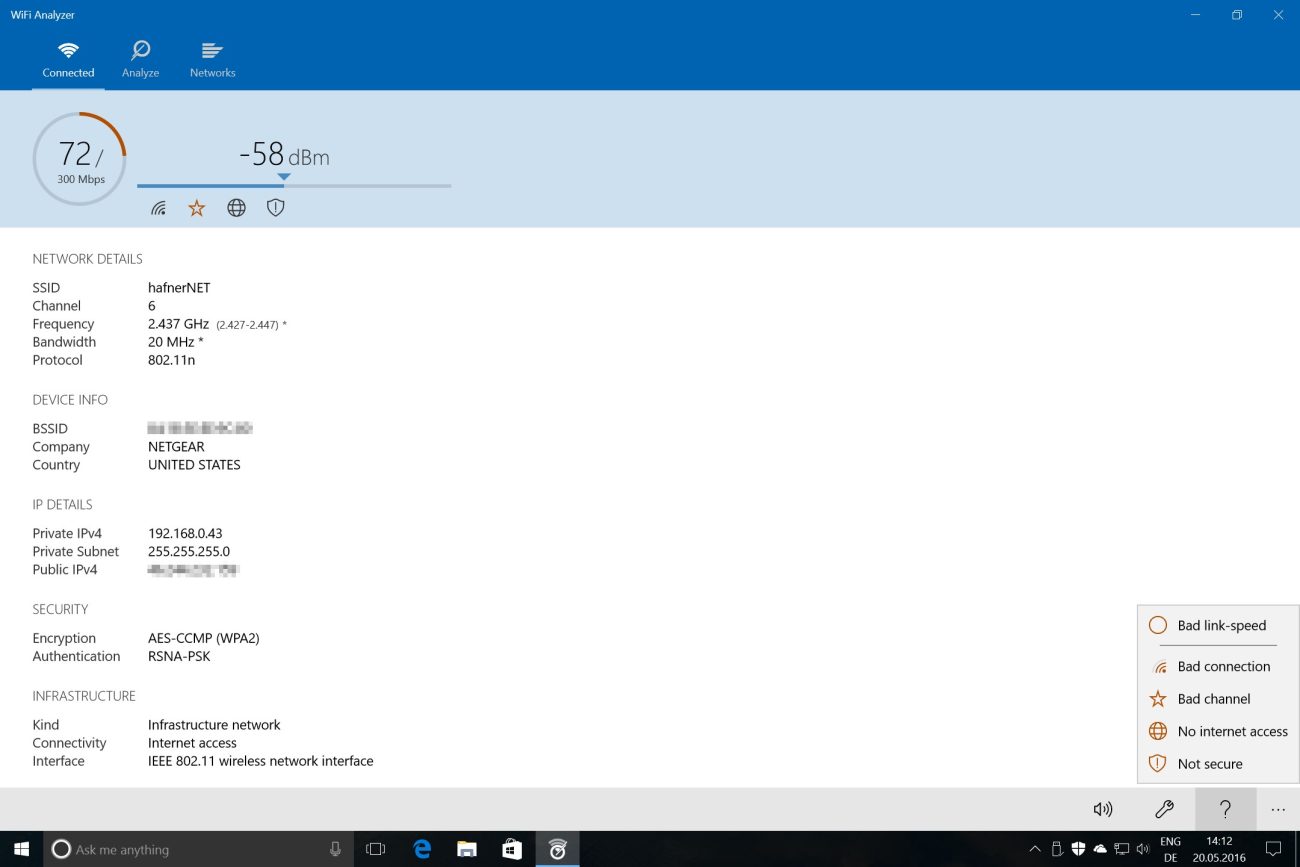
1. Open your router’s web interface. This is usually done by typing http://192.168.1.1 or http://192.168.0.1 into your web browser’s address bar.
2. Look for a section labeled “Wireless” or “Wi-Fi.”
3. Find the option to scan for the best channel to use. This might be called “Channel Scan,” “Automatic Channel Selection,” or something similar.
4 . Click the button to start the scan. Once it’s finished, you should see a list of channels and their associated signal strength.
5. Select the channel with the strongest signal. In general, you want to choose a channel that’s not being used by many other devices.
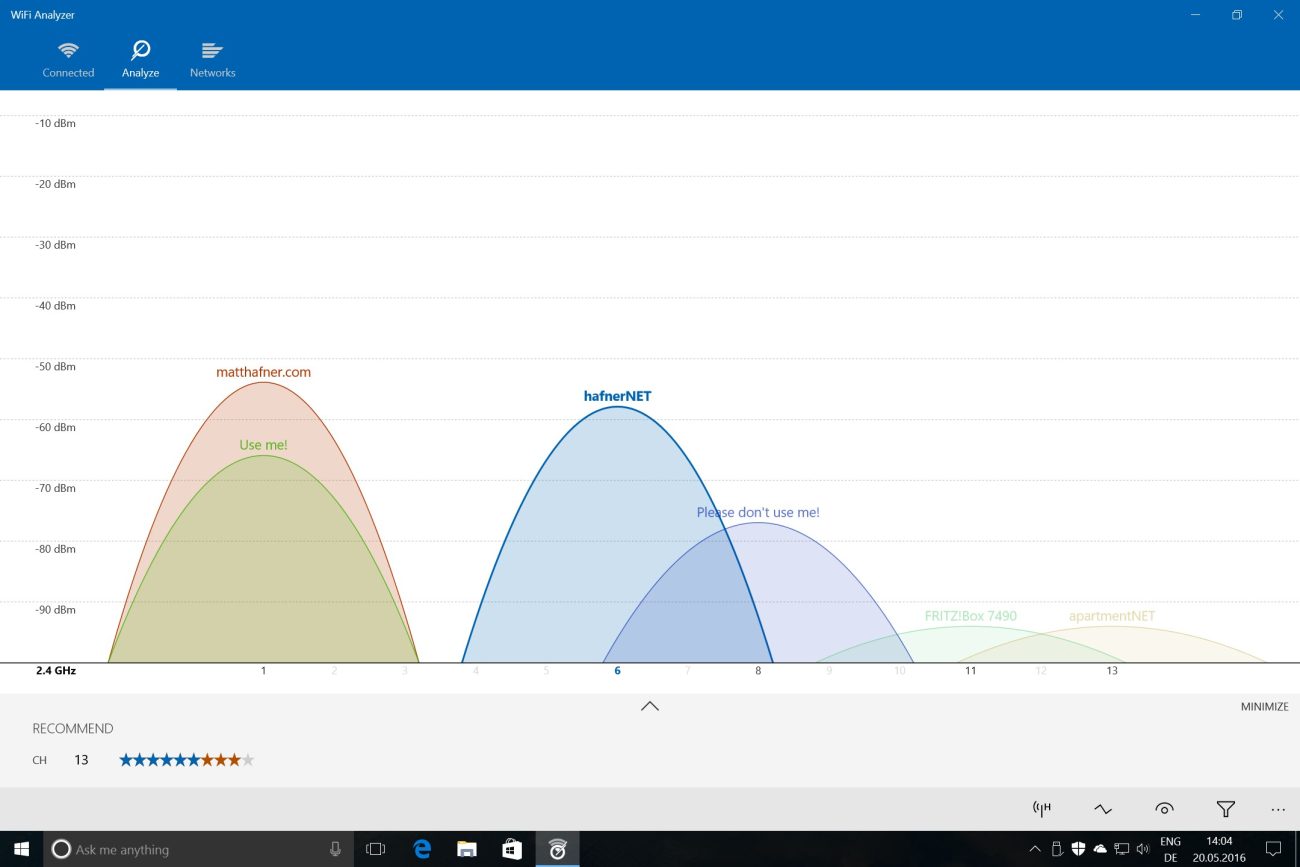
If you’re not sure which channel to choose, try using a tool like InSSIDer or Wi-Fi Analyzer to see which channels are being used the most in your area.
Once you’ve selected a new channel, save your changes and restart your router. This will apply the new settings and hopefully improve your Wi-Fi connection.
2. Update Your Router’s Firmware
If you’re using an older router, it might be time for an update. Manufacturers regularly release new versions of firmware with bug fixes and performance improvements. Updating your router’s firmware is usually a simple process that only takes a few minutes.
Updating your router’s firmware
Another common cause of an unstable Wi-Fi connection is outdated router firmware. Manufacturers regularly release new versions of firmware with bug fixes and performance improvements. Updating your router’s firmware is usually a simple process that only takes a few minutes. Check your router’s documentation or website to find out how to update its firmware.
1. Open your router’s web interface. This is usually done by typing http://192.168.1.1 or http://192.168.0.1 into your web browser’s address bar.
2. Look for a section labeled “Firmware” or “Update .”
3. Click the button to check for updates. If there are any available, you should see a list of them.
4. Select the update you want to install and click the “Install” button.
5. Follow the prompts to complete the installation process.
Once the update has been installed, restart your router and check to see if the Wi-Fi connection is now stable.
If your router’s firmware is up to date or you can’t find a section for updating it, the next step is to try changing your Wi-Fi channel.
3. Move Your Router closer to Your Computer
If your computer and router are far apart, it can weaken the signal and cause instability. Try moving your router closer to your computer, or vice versa, to see if it improves the connection.
4. Use a Different Wireless Mode
If your router supports multiple wireless modes, such as 802 . 11 b / g / n / ac, try changing which mode it’s using. Each mode has its own benefits and drawbacks, so experiment to see which one works best in your environment.
5. Get a Stronger Antenna
If you live in a large home or office, chances are you could benefit from upgrading to a stronger antenna. Many routers come with detachable antennas that can be replaced with aftermarket options
What causes an unstable Wi-Fi connection?
There are a few common reasons for an unstable Wi-Fi connection. One of the most common is interference from other wireless devices. If you have multiple devices competing for the same frequency band, it can lead to signal degradation and dropouts. Another common cause is outdated router firmware. Manufacturers regularly release new versions of firmware with bug fixes and performance improvements. If you’re using an older router, it might be time for an update. Finally, distance can also be a factor. If your computer and router are far apart, it can weaken the signal and cause instability.
If you’re troubleshooting an unstable Wi-Fi connection, these are some of the most common causes to check.
Changing Your Wireless Channel
Routers typically broadcast on one of two frequency bands: 2.4 GHz and 5 GHz. The 2.4 GHz band has a longer range but is more susceptible to interference from other devices, while the 5 GHz band has a shorter range but is less prone to interference.
If your router supports both bands, you can try changing which band it’s using to see if it makes a difference. To do this, open your router’s web interface and look for a section labeled “Wireless” or “Wi-Fi.” Then, find the option to change the wireless band and select the other one. Save your changes and restart your router to apply the new settings.
If you’re still having trouble with interference, you can try changing the wireless channel that your router is using. Each band has several channels that devices can use to communicate, and some of these channels are less crowded than others.
To change your router’s channel, open its web interface and look for a section labeled “Wireless” or “Wi-Fi.” Then, find the option to change the wireless channel and select a different one. Save your changes and restart your router to apply the new settings.
Using a Different Frequency Band
Wi-Fi devices can communicate on two different frequency bands: 2.4 GHz and 5 GHz. The 2.4 GHz band has a longer range but is more susceptible to interference from other devices, while the 5 GHz band has a shorter range but is less prone to interference.
If your router supports both bands, you can try changing which band it’s using to see if it makes a difference. To do this, open your router’s web interface and look for a section labeled “Wireless” or “Wi-Fi.” Then, find the option to change the wireless band and select the other one. Save your changes and restart your router to apply the new settings.
Checking Your Modem
Paying for a higher-speed internet plan
If you’re paying for a higher-speed internet plan but your modem isn’t able to take advantage of that speed, it may be time for an upgrade.
There are a few things you can do to check if your modem is the bottleneck in your internet speeds:
1. Check the specifications of your modem against your internet plan. If you’re paying for a 100Mbps plan but your modem only supports speeds up to 50Mbps, then it’s likely limiting your speeds.
2. Use an online speed test tool to check what speeds you’re actually getting. Be sure to test at different times of day and on different days of the week, as internet traffic can affect speeds.
3. Contact your ISP and ask them if they have any recommendations for modems that would work well with your plan.
If you determine that your modem is the bottleneck in your internet speeds, upgrading to a new one can make a big difference. Just be sure to do your research and pick a modem that’s compatible with your ISP and plan.
Restarting your devices
Performing a factory reset
Restarting your devices can often fix minor software glitches that may be causing stability issues. To restart your router, simply unplug it from the power outlet and wait a few seconds before plugging it back in. For computers and other devices, you can usually find a restart option in the settings menu.
If restarting your devices doesn’t fix the problem, you may need to perform a factory reset. This will erase all of the data on your devices and restore them to their default settings. To do this, you’ll need to find the reset button on each device. For routers, this is usually located in a small hole on the back of the device. Once you’ve found the reset button, press and hold it for 30 seconds or more until the device powers off and resets itself.
Factory resetting your devices should only be a last resort, as it will erase all of your data and settings.
Checking For Interference
When troubleshooting an unstable Wi-Fi connection, one of the first things you should do is check for interference. Interference can come from a variety of sources, including other wireless devices, electrical appliances, and even your neighbor’s Wi-Fi network.
To check for interference, start by turning off all wireless devices in your home or office. This includes computers, smartphones, tablets, printers, and more. Then, try to connect to your Wi-Fi network and see if the connection is now stable. If it is, then you know that interference was likely the cause of your problems.
Once you’ve identified the source of interference, there are a few things you can do to fix it:
1. Change the channel that your router is using. This will help reduce interference from other devices that are using the same channel.
2. Move your router to a different location. This will help reduce interference from electrical appliances and other devices in your home or office.
3. Upgrade to a higher quality router. This will help reduce interference from other Wi-Fi networks in your neighborhood.
4. Use a Wi-Fi extender. This will help extend the reach of your Wi-Fi network and reduce interference from other devices
Conclusion
By following these tips, you can fix an unstable Wi-Fi connection and enjoy a better experience online.
We hope you found this article helpful. Thank you for reading! We hope you found this article helpful. Thank you for reading!